MAIN STREET MAVERICK
Client Onboarding

Welcome to Main Street!

Here is how to grant Main Street Maverick access, with a screenshot for every step. Each grant works by invitation to hello@mainstreetmaverick.com: you never share a password, you stay the owner, and you can revoke access at any time with one click.

One security rule before anything else: never email us a password. Every step on this page is an invitation, not a credential hand-off. If a step ever seems to require sending a password, stop and email us at hello@mainstreetmaverick.com instead.

1Wix (your website)

About 2 minutes. You need: your Wix login, and to be the site owner or an existing Admin.

Grants us the ability to fix on-page SEO, page speed, schema, and content inside your site.
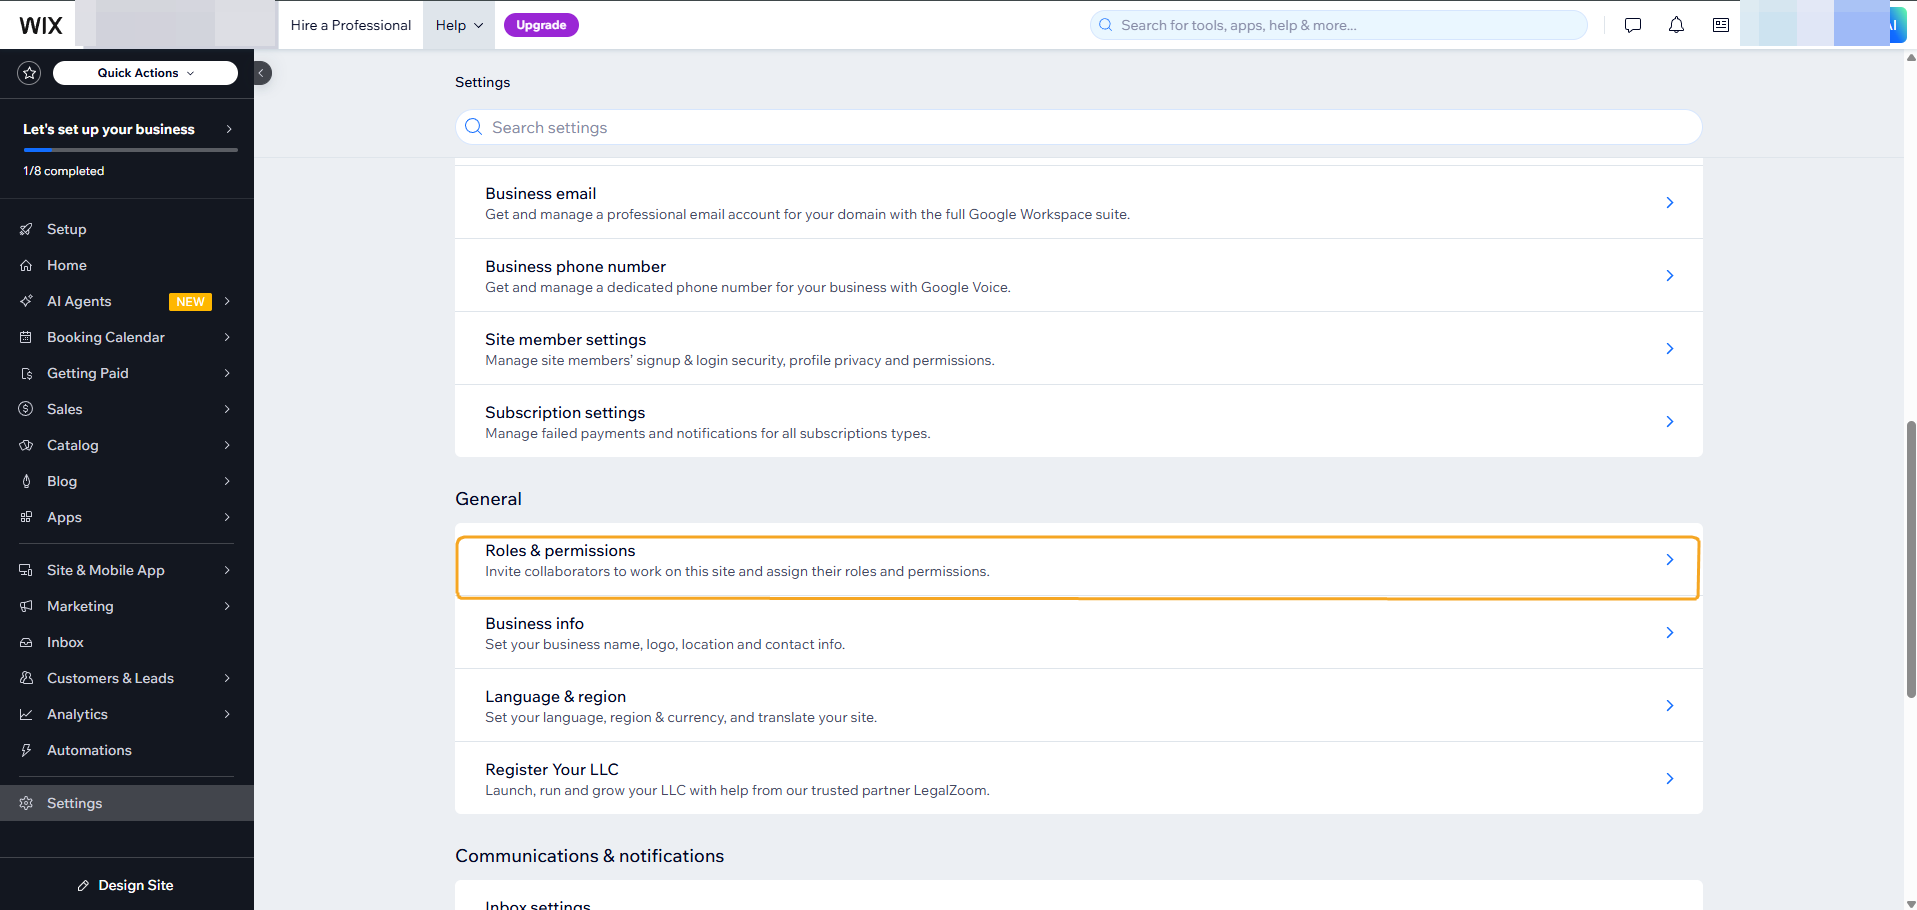
Step 1. In your Wix dashboard, click Settings in the left menu, then click Roles & permissions under General.
Wix Settings screen with Roles and permissions highlighted under the General section
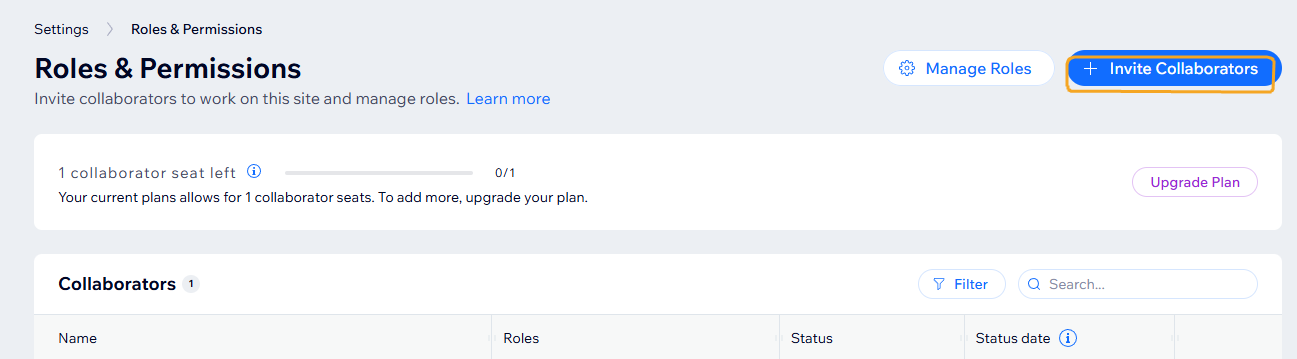
Step 2. Click + Invite Collaborators in the top-right corner.
Wix Roles and Permissions page with the Invite Collaborators button highlighted
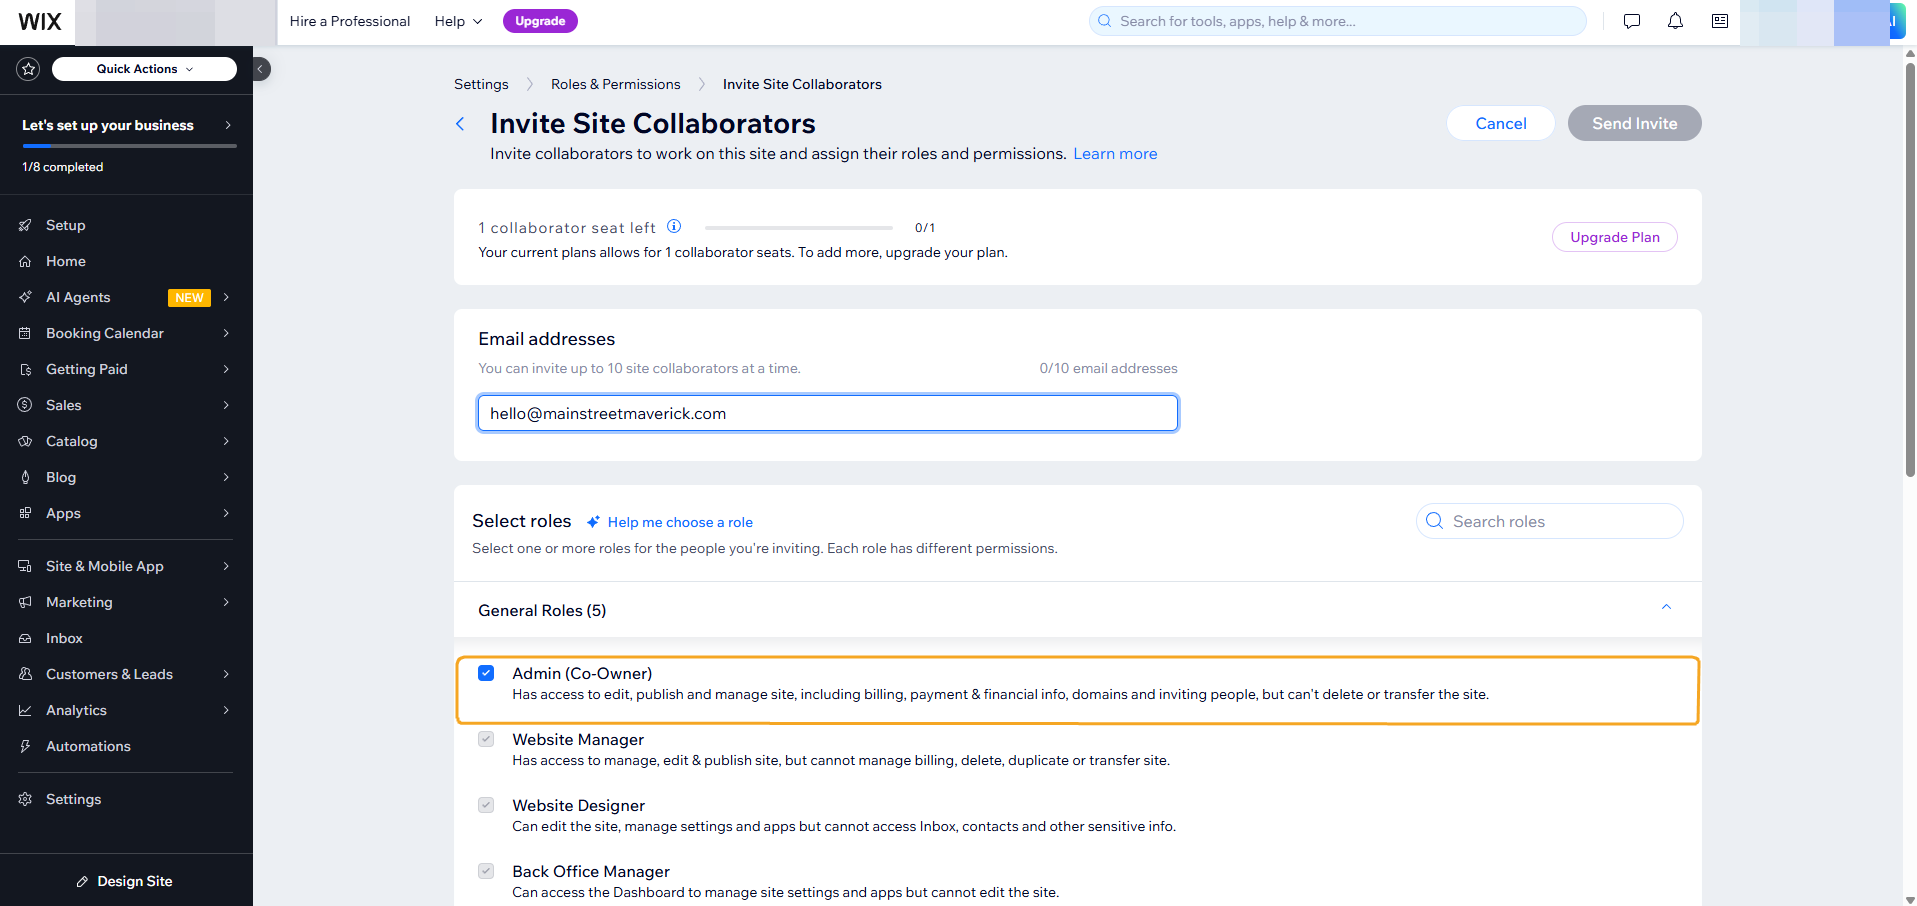
Step 3. Enter hello@mainstreetmaverick.com, check the Admin (Co-Owner) role, and click Send Invite. Wix emails us the invitation automatically; there is nothing to send us.
Wix Invite Site Collaborators form with the email entered and Admin Co-Owner role checked

2WordPress (your website)

About 2 minutes. You need: your WordPress login.

Grants us the ability to fix on-page SEO, page speed, schema, and content inside your site.
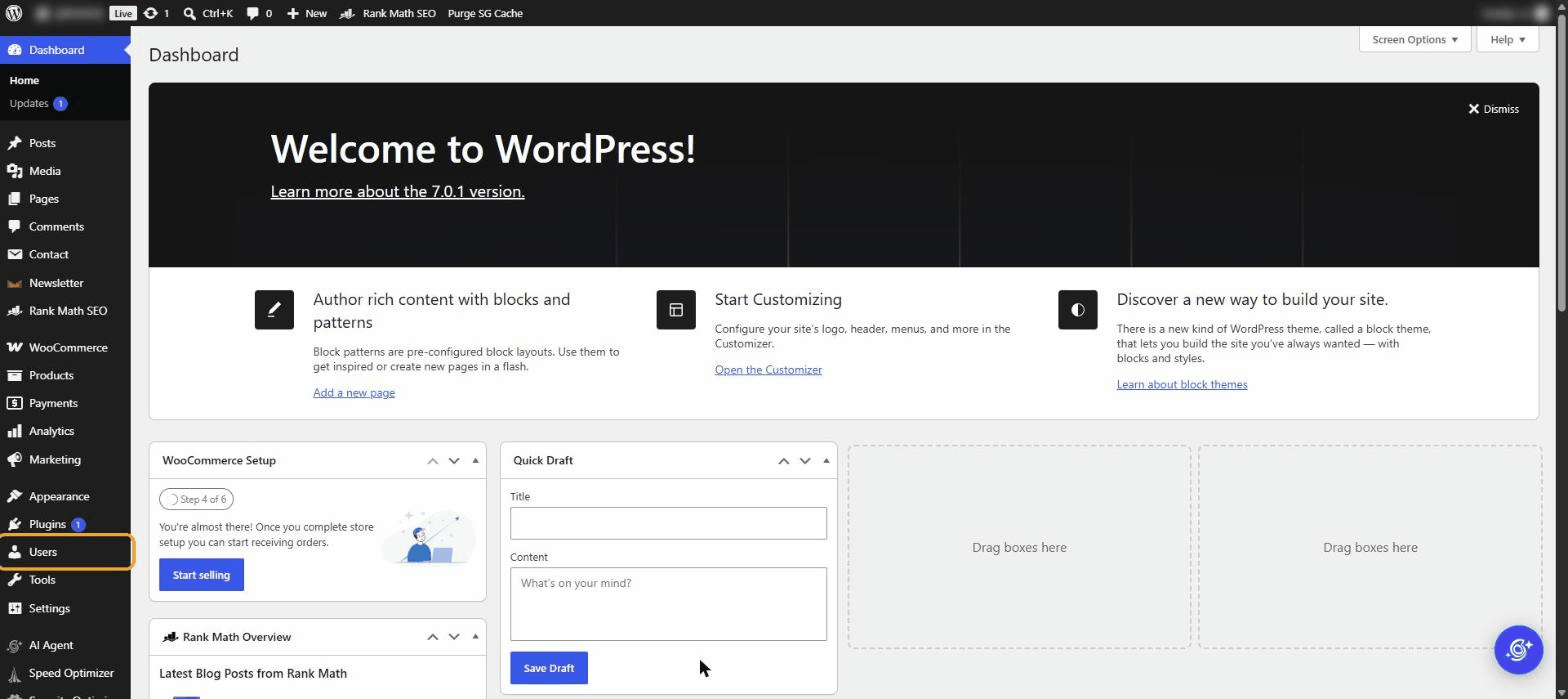
Step 1. Log in to your WordPress dashboard, usually at yourdomain.com/wp-admin. In the left menu, click Users.
WordPress dashboard with the Users menu highlighted in the left sidebar
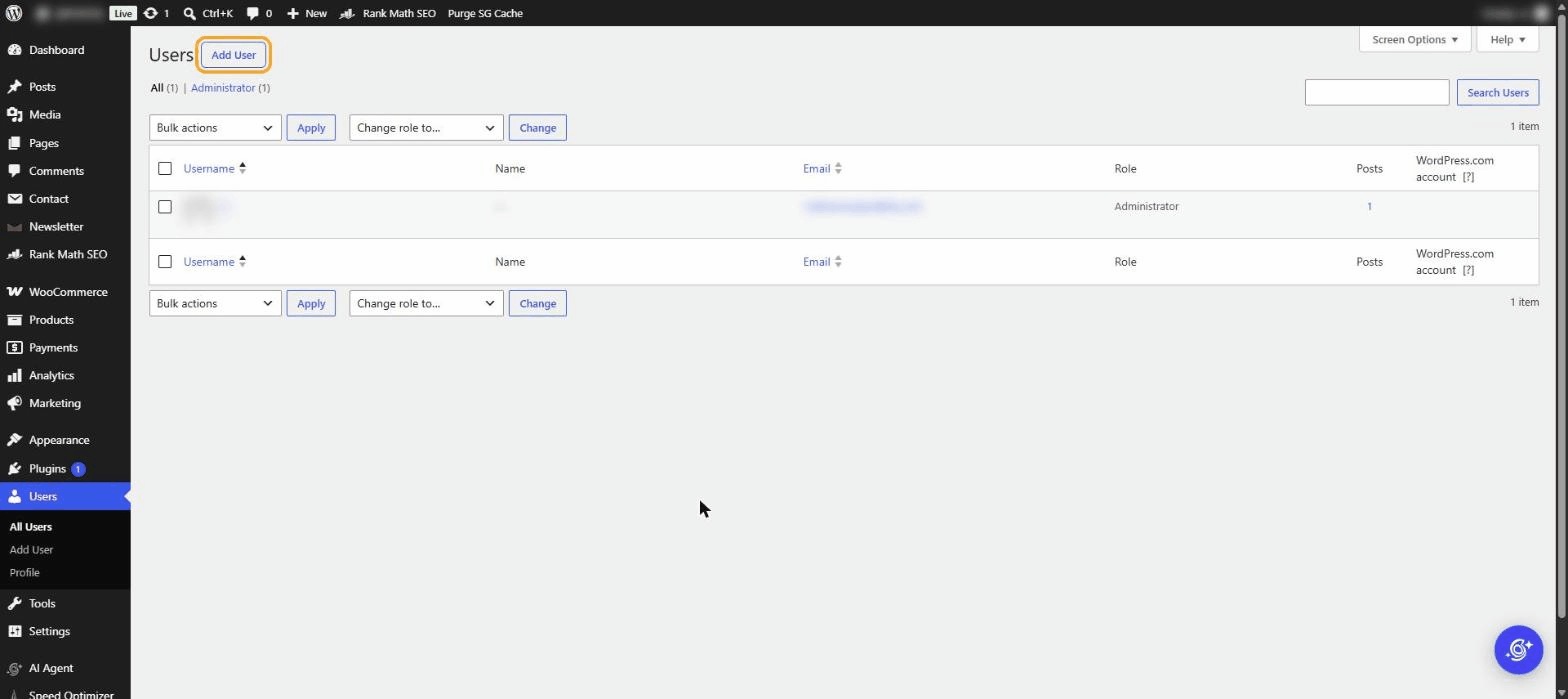
Step 2. At the top of the Users screen, click Add New User.
WordPress Users screen with the Add New User button highlighted
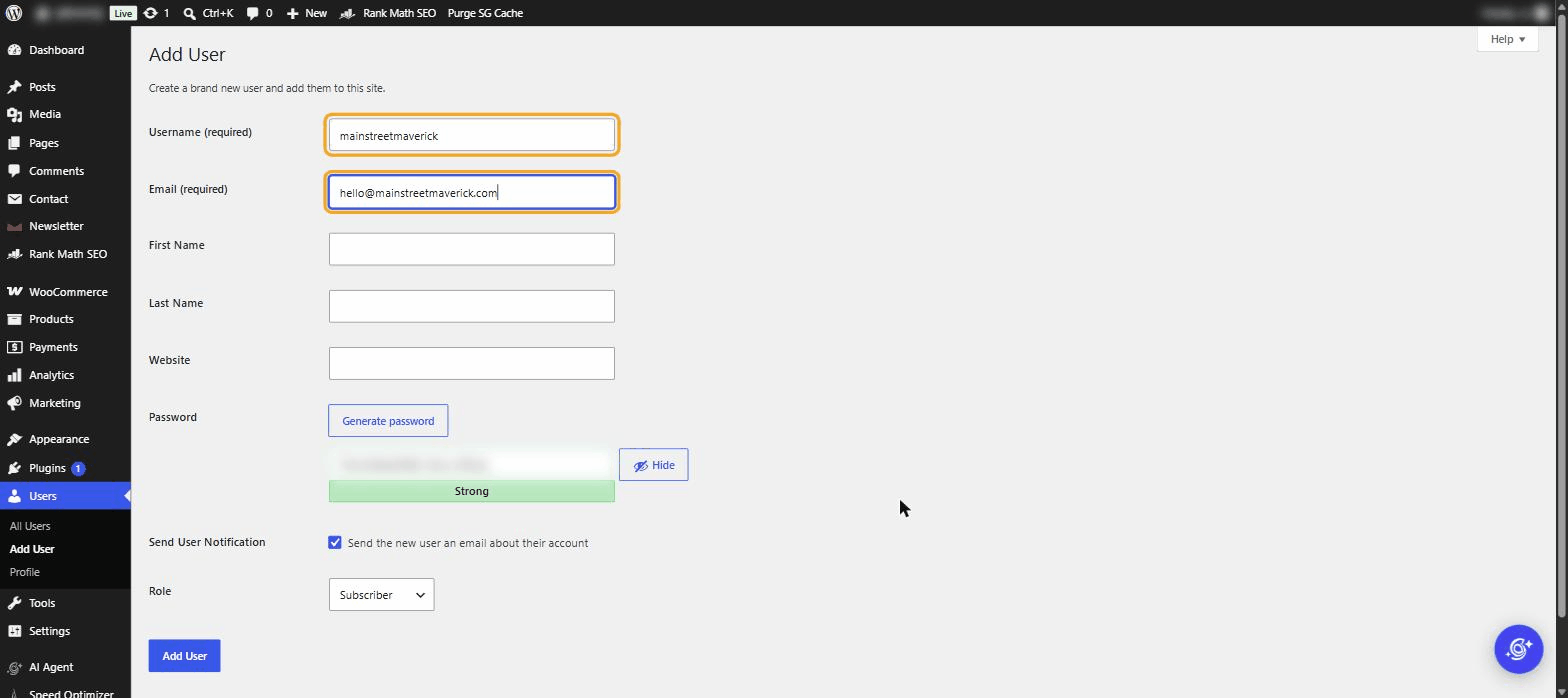
Step 3. Enter Username: mainstreetmaverick and Email: hello@mainstreetmaverick.com.
Add New User form with username and email fields filled in and highlighted
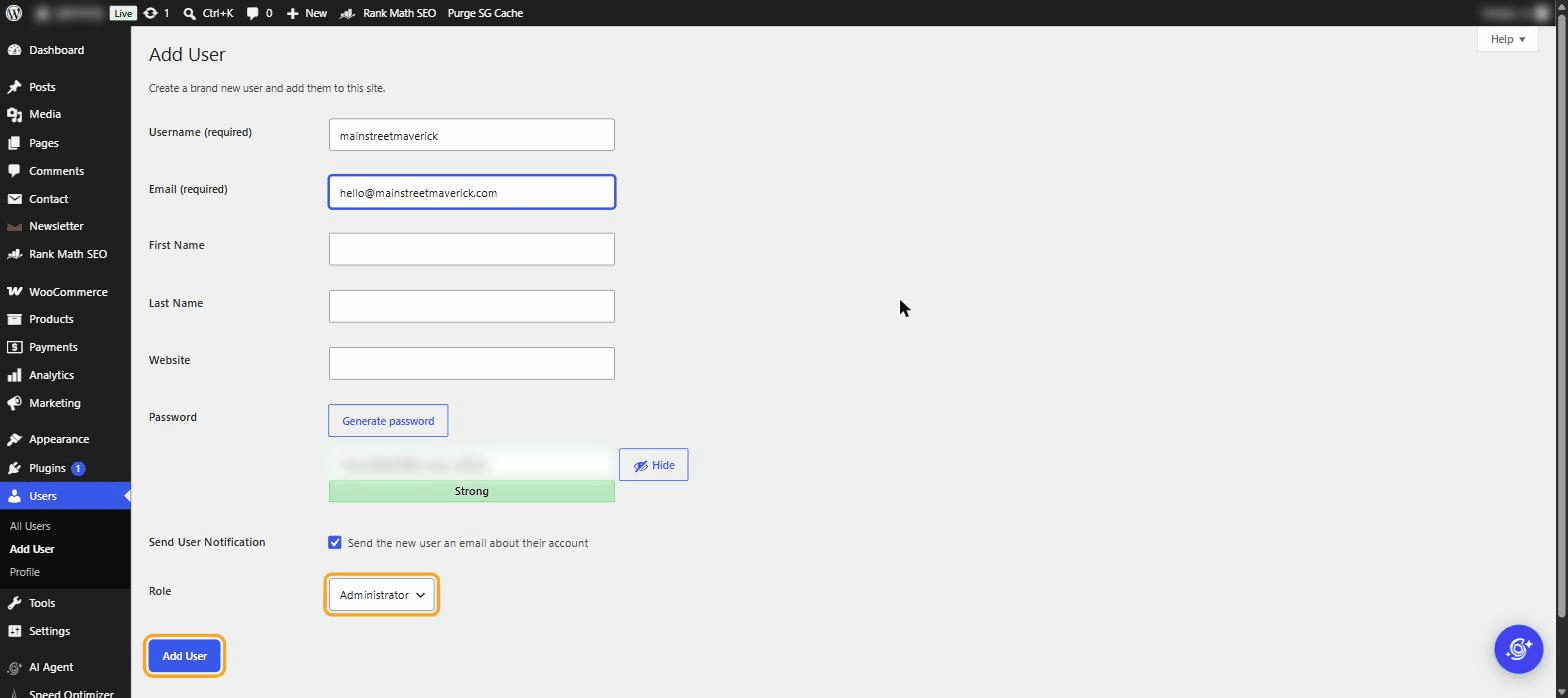
Step 4. Set the Role dropdown to Administrator, leave "Send User Notification" checked, and click Add New User. WordPress emails us a login link automatically; there is nothing to send us.
Role dropdown set to Administrator with Send User Notification checked and the Add New User button highlighted

3GoDaddy (your domain)

About 2 minutes. You need: your GoDaddy login.

Grants us the ability to add DNS records that protect your email deliverability and verify your site with Google. GoDaddy calls this Delegate Access, and it never exposes your password or payment methods.
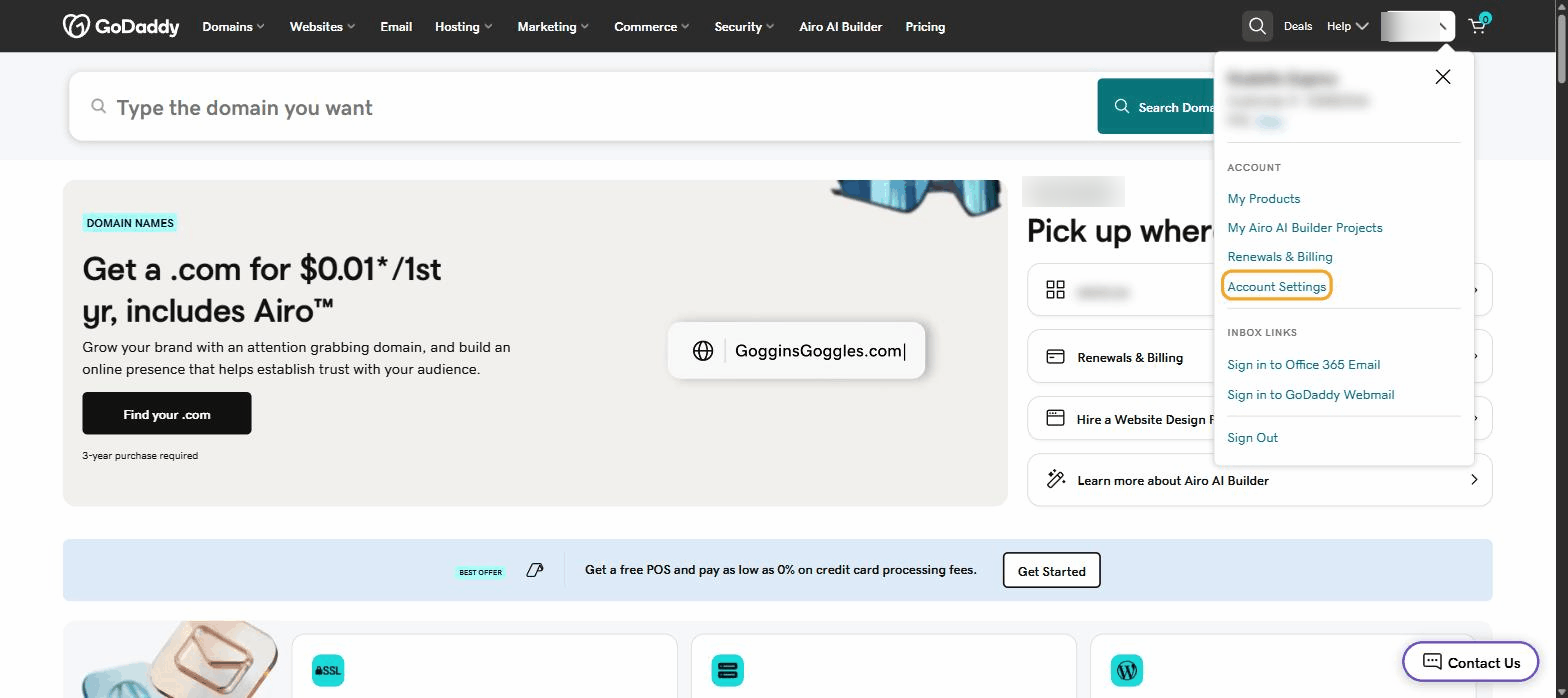
Step 1. Sign in at godaddy.com, click your name in the top-right corner, then click Account Settings.
GoDaddy account menu open with Account Settings highlighted
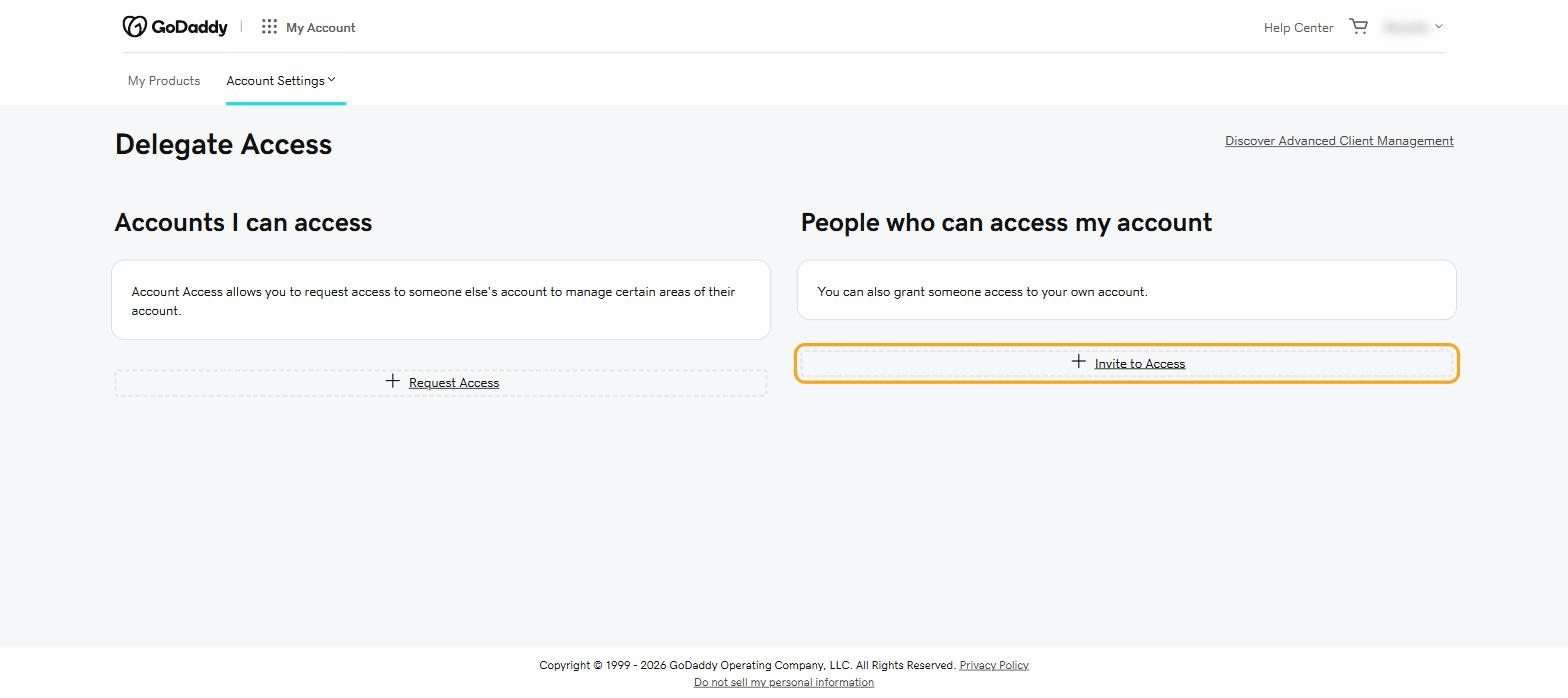
Step 2. Click Delegate Access, then under "People who can access my account" click Invite to Access.
GoDaddy Delegate Access page with Invite to Access highlighted
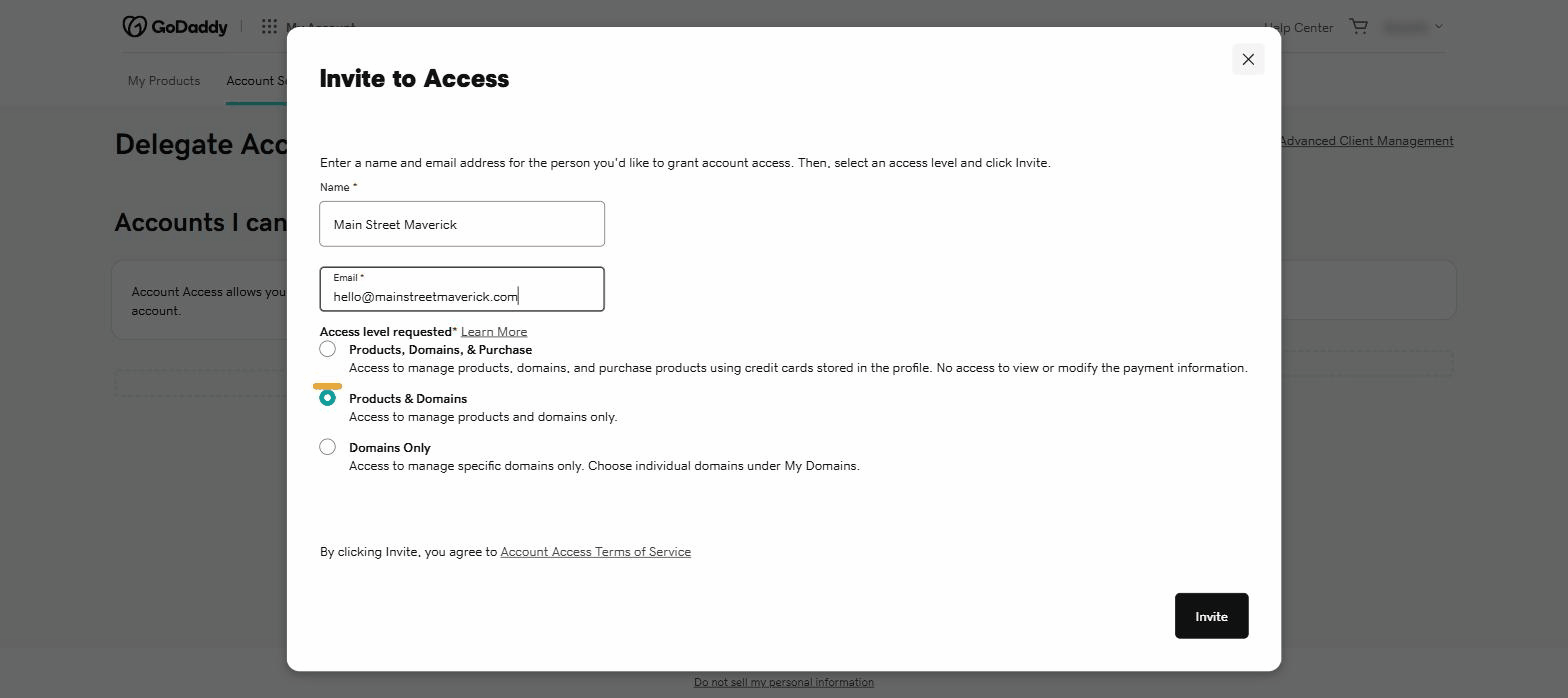
Step 3. Enter Name: Main Street Maverick, Email: hello@mainstreetmaverick.com, choose the Products & Domains access level (we do not need purchasing ability), and click Invite.
GoDaddy invite form filled out with the Products and Domains access level selected

4Cloudflare (your domain)

About 2 minutes. You need: your Cloudflare login. Only fill this out if Cloudflare manages your DNS instead of GoDaddy; most sites need only one of the two.

Grants us the ability to add DNS records that protect your email deliverability and verify your site with Google and AI platforms, check whether AI crawlers can reach your site, and adjust caching or SSL settings when they affect page speed.
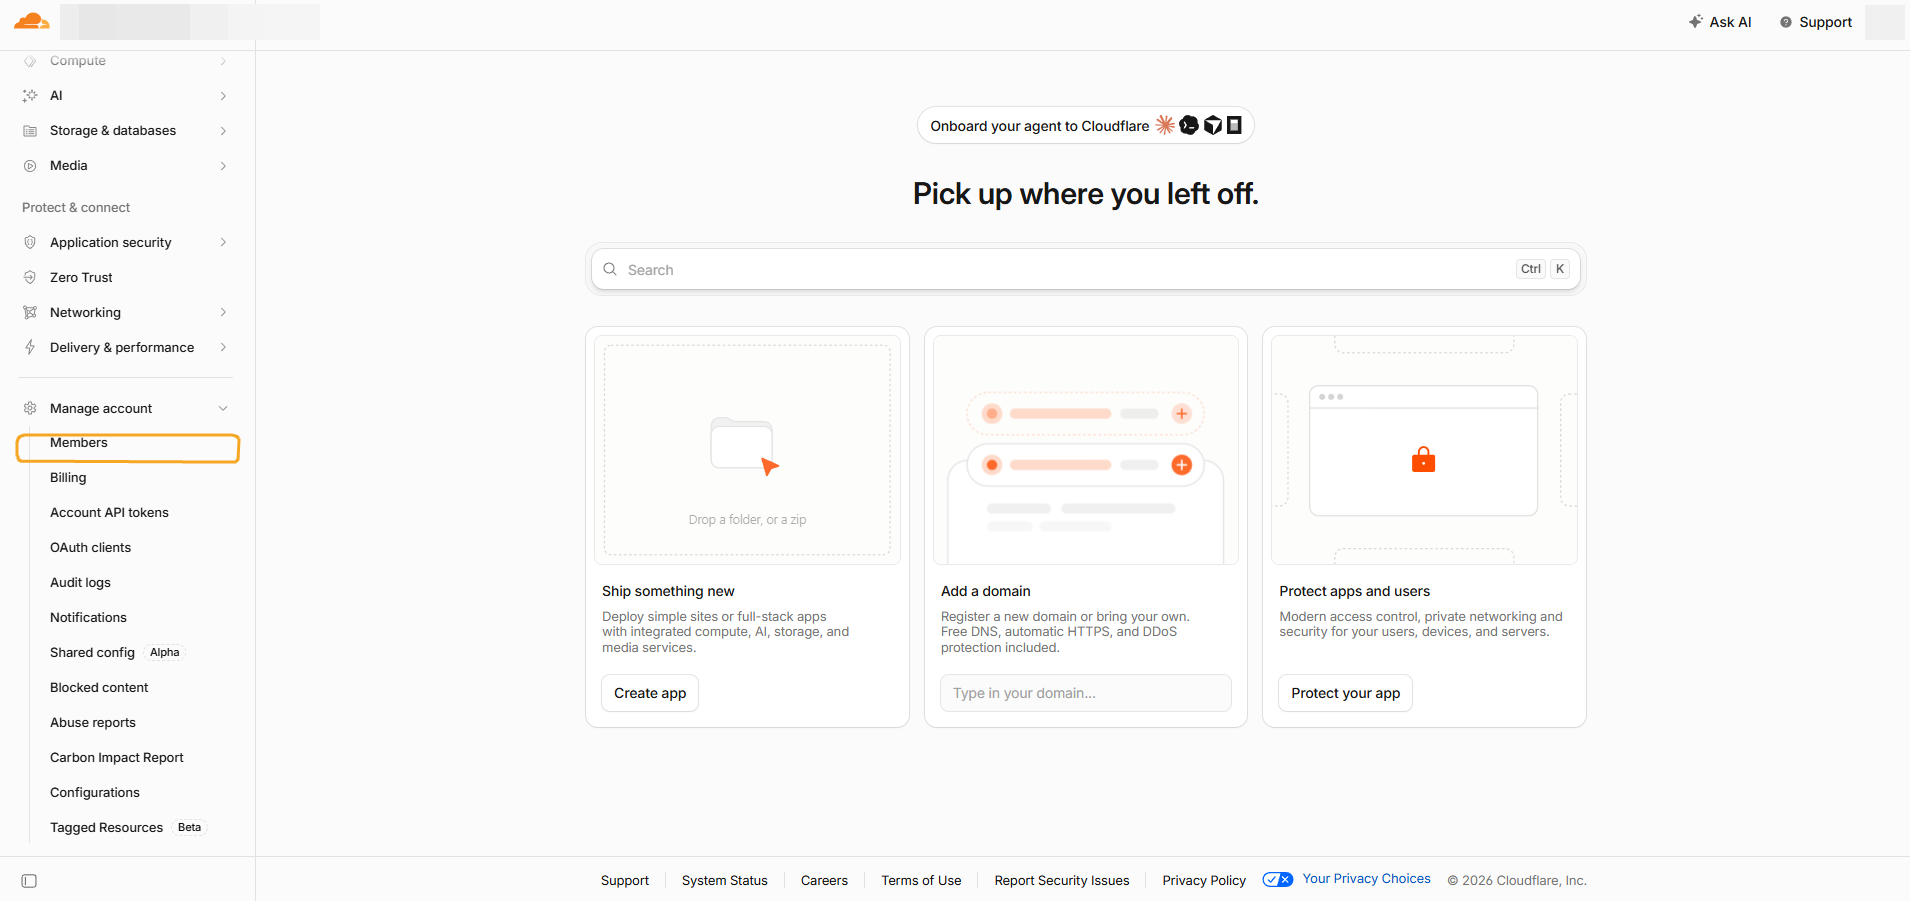

Step 1. In your Cloudflare dashboard, click Manage Account in the left menu, then click Members.
Cloudflare dashboard with Manage Account expanded and Members highlighted in the left sidebar
Step 2. Click + Invite members in the top-right corner.
Cloudflare Members page with the Invite members button highlighted
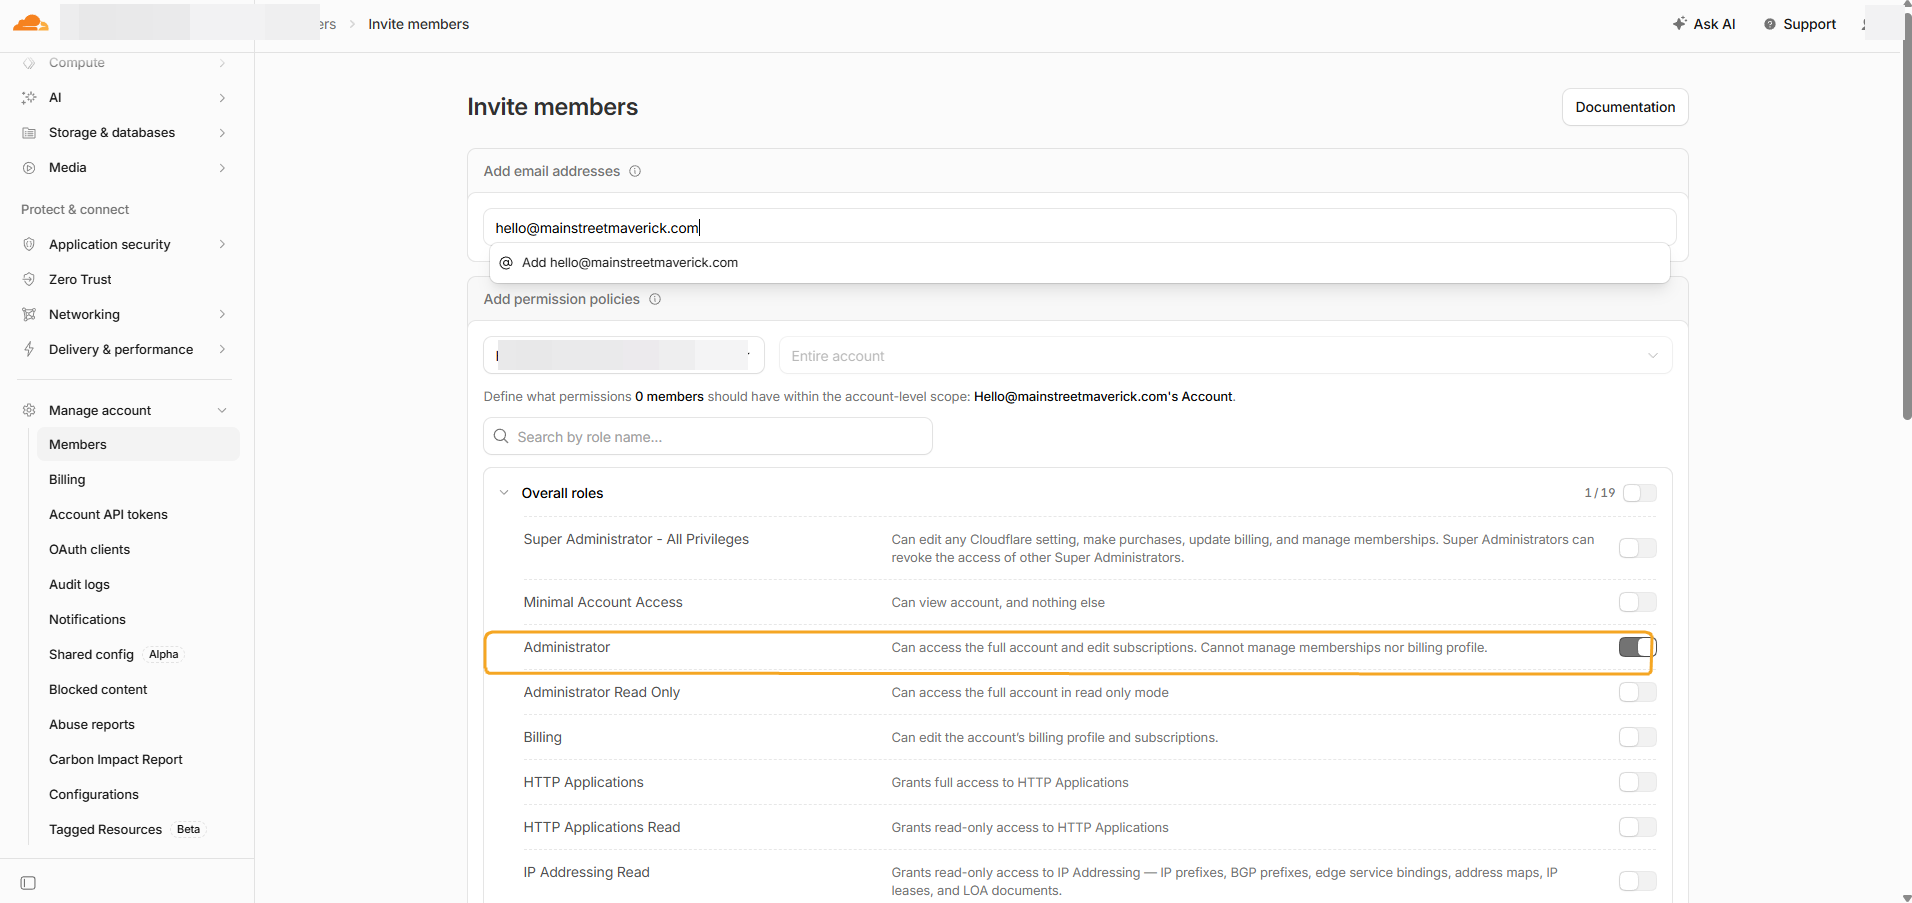
Step 3. Enter hello@mainstreetmaverick.com, then under permission policies select the Administrator role for the entire account, and send the invite. Cloudflare has a narrower DNS-only role, but Administrator is the right scope for our work: it also covers the firewall setting that can silently block AI crawlers, and the SSL and caching settings we sometimes need to adjust for page speed. It stops short of billing and membership control, so we still can't touch your payment details or remove other admins.
Cloudflare Invite members form with the Administrator role selected

5Google Business Profile

About 2 minutes. You need: the Google account that manages your business listing.

Grants us the ability to keep your listing accurate, post updates, and respond to what customers see on Google Maps and Search. If you have never claimed your profile, skip this section and tell us; claiming it is something we handle for you.
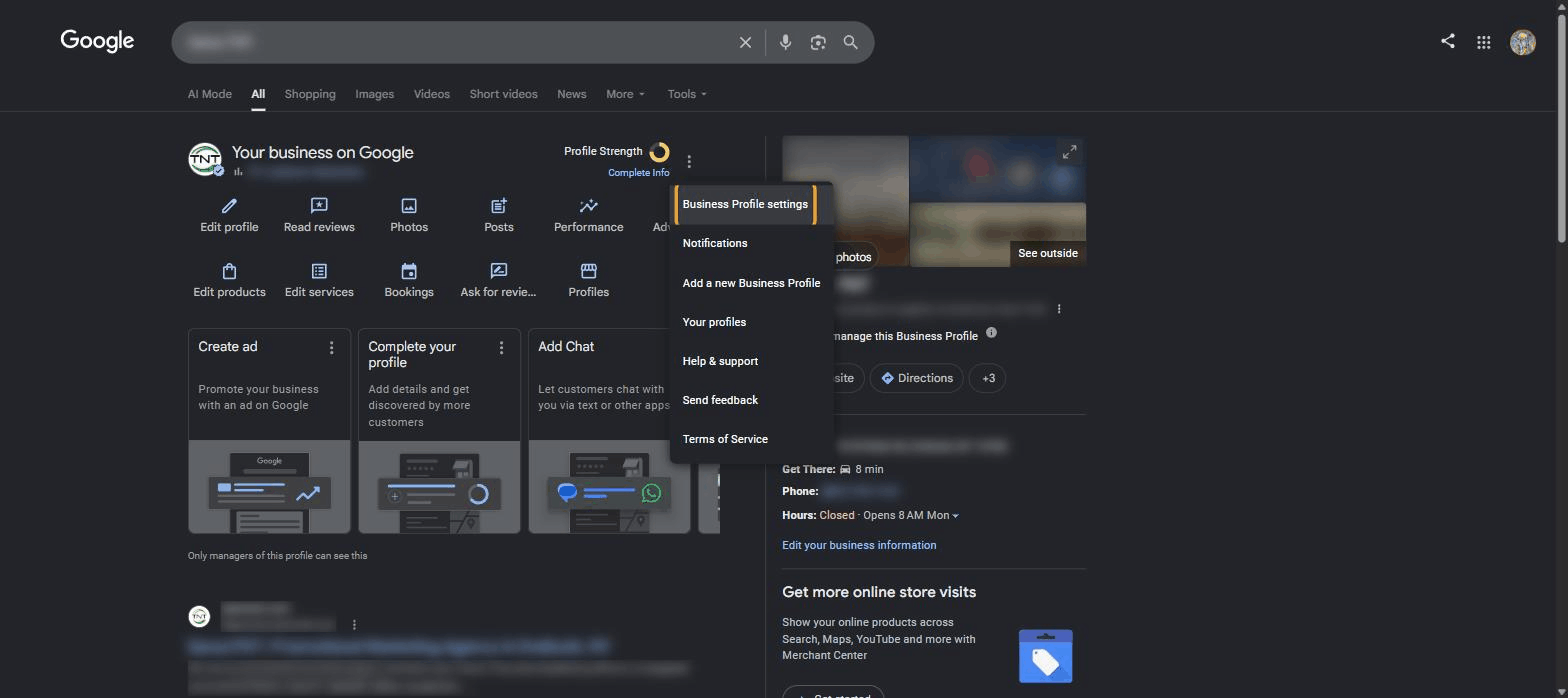
Step 1. Go to business.google.com, sign in, and select your business. Click the three-dot menu, then Business Profile settings.
Google Business Profile three-dot menu open with Business Profile settings highlighted
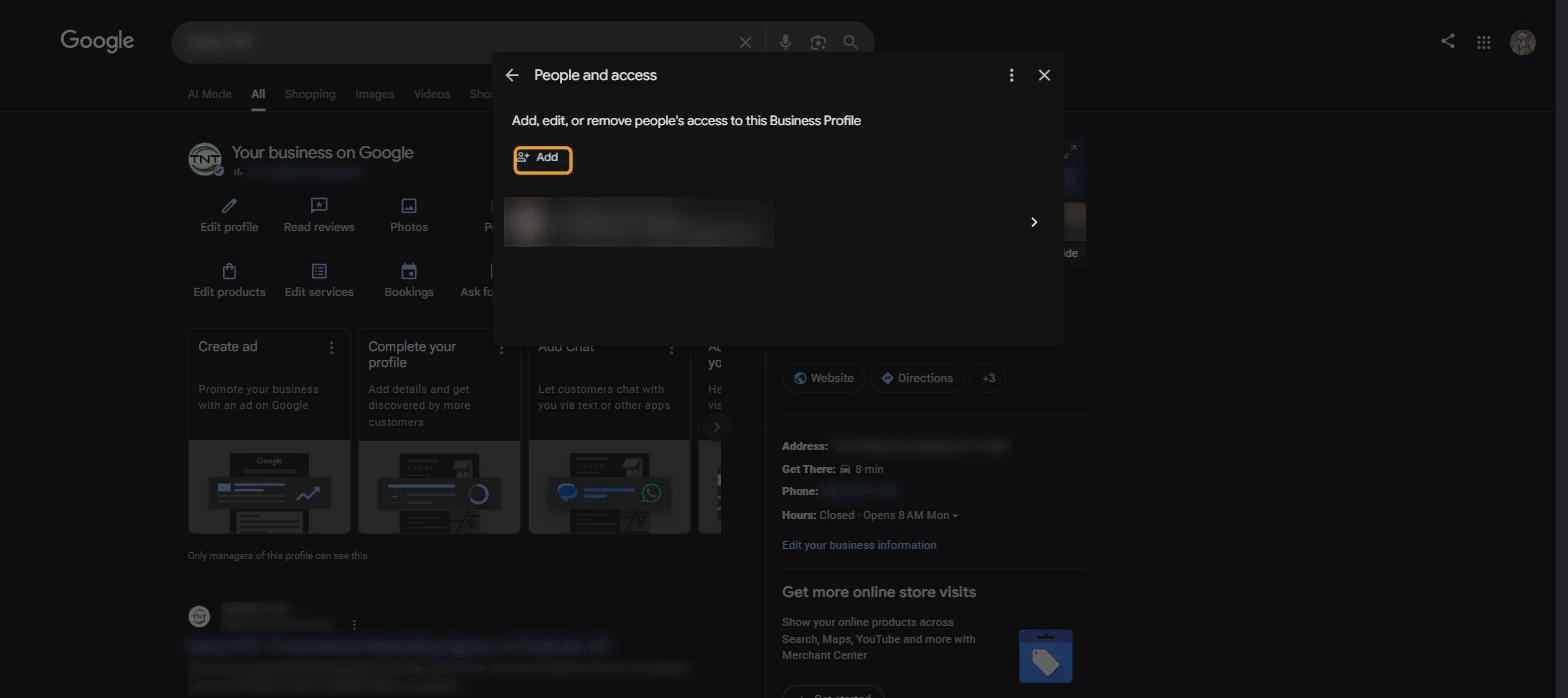
Step 2. Click People and access, then click Add.
People and access screen with the Add button highlighted
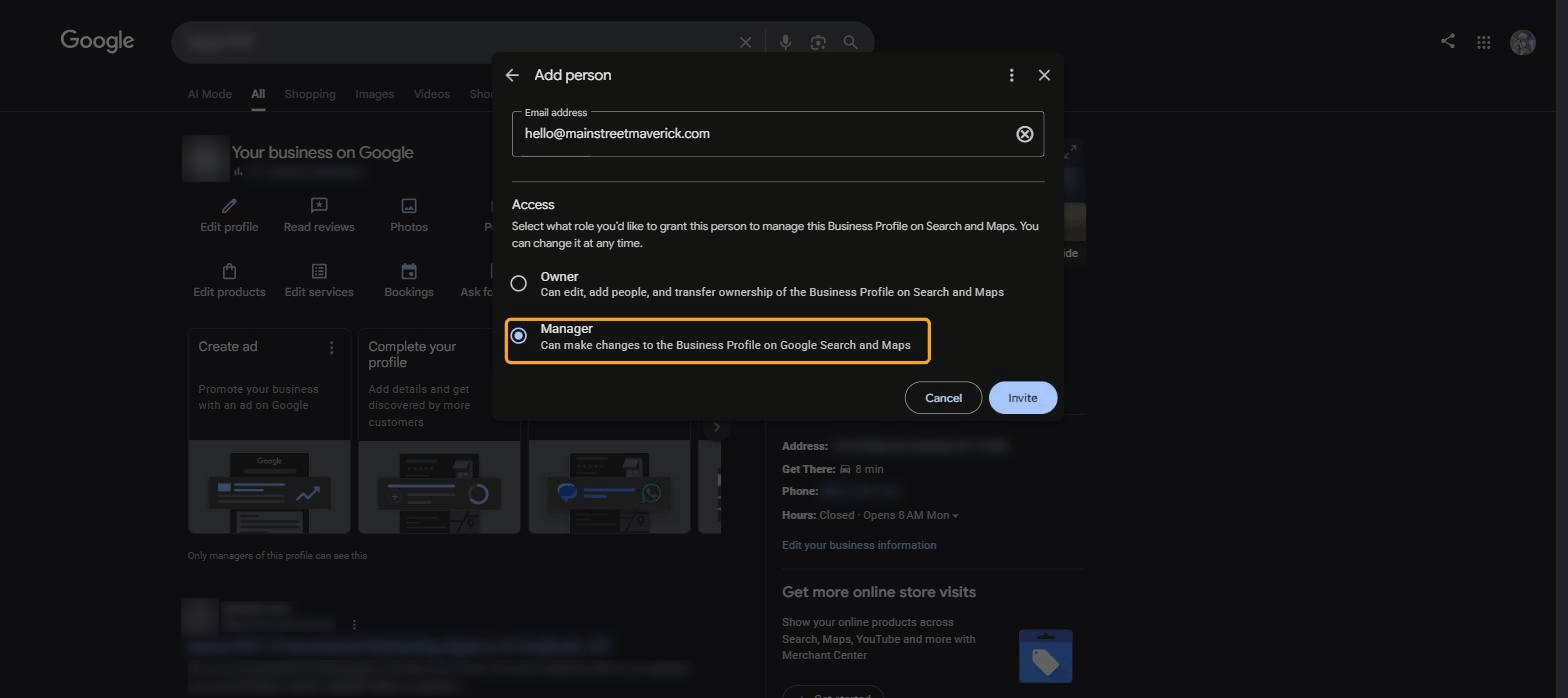
Step 3. Enter hello@mainstreetmaverick.com, choose the Manager role, and click Invite.
Add people dialog with the email entered and Manager role selected

6Google Analytics

About 2 minutes. You need: the Google account that owns your Analytics property. If you do not have Analytics yet, skip this; we set it up and make you the owner.

Grants us the ability to see and configure your traffic measurement so we can prove what is working.
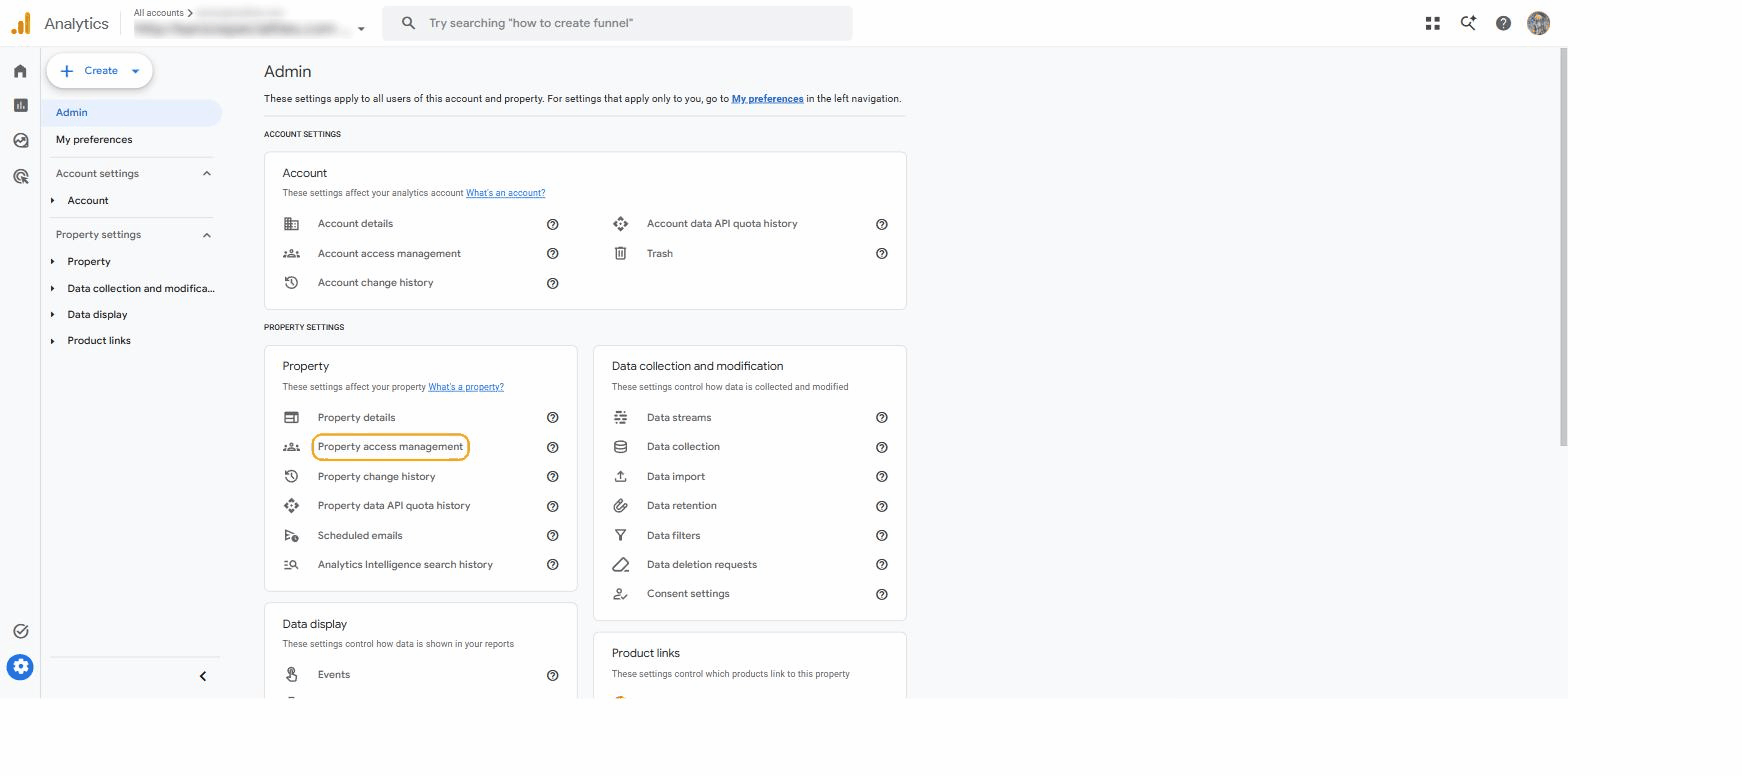
Step 1. At analytics.google.com, click the Admin gear in the bottom-left corner, then under Property click Property access management.
Google Analytics Admin screen with Property access management highlighted
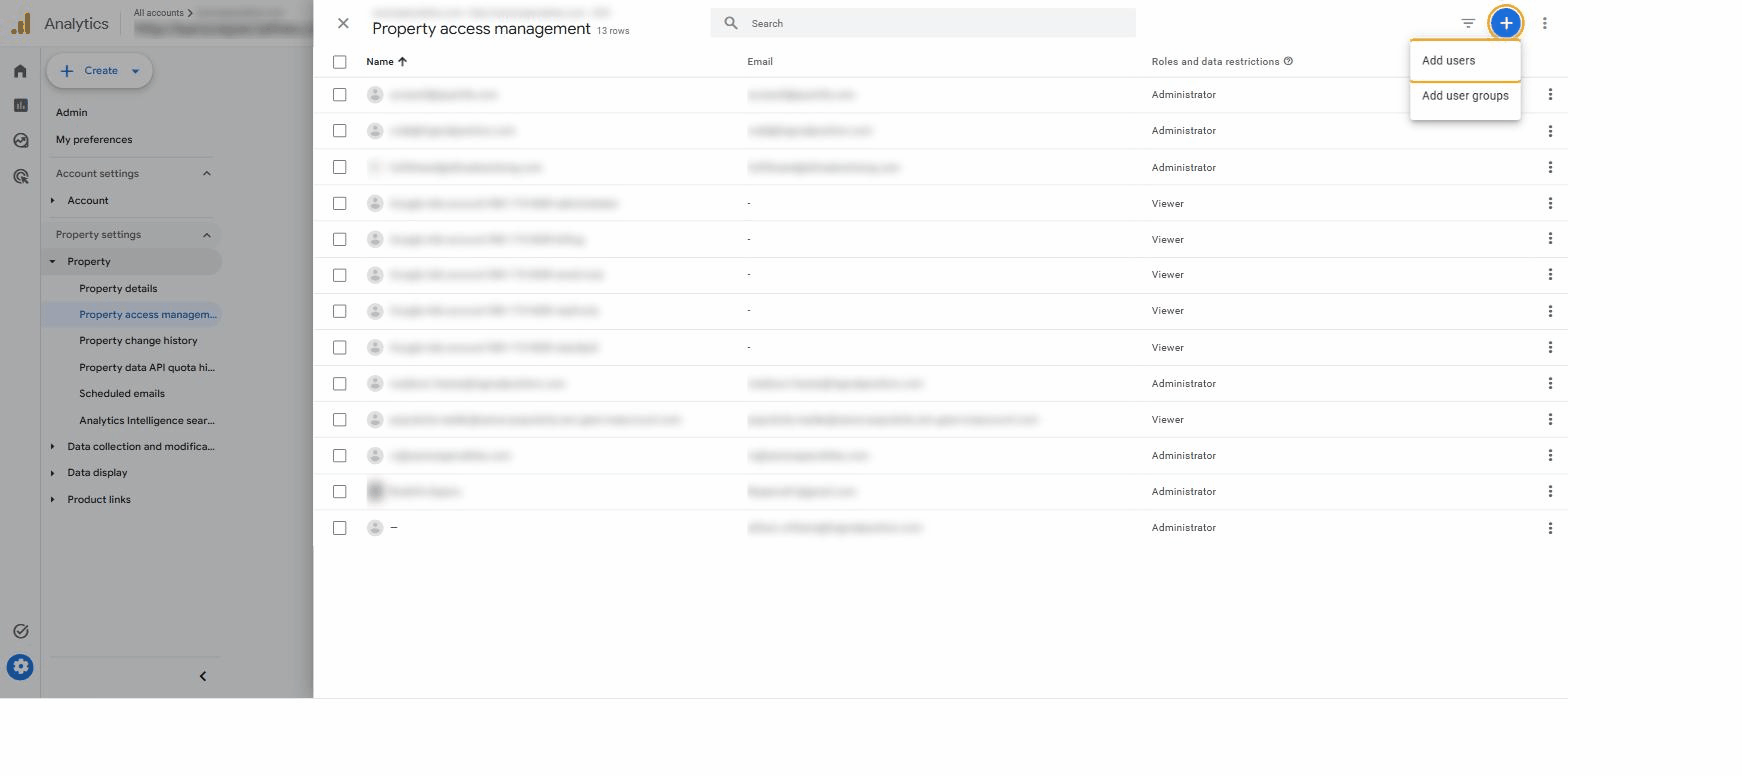
Step 2. Click the + button in the top-right, then Add users.
Property access management panel with the plus and Add users buttons highlighted
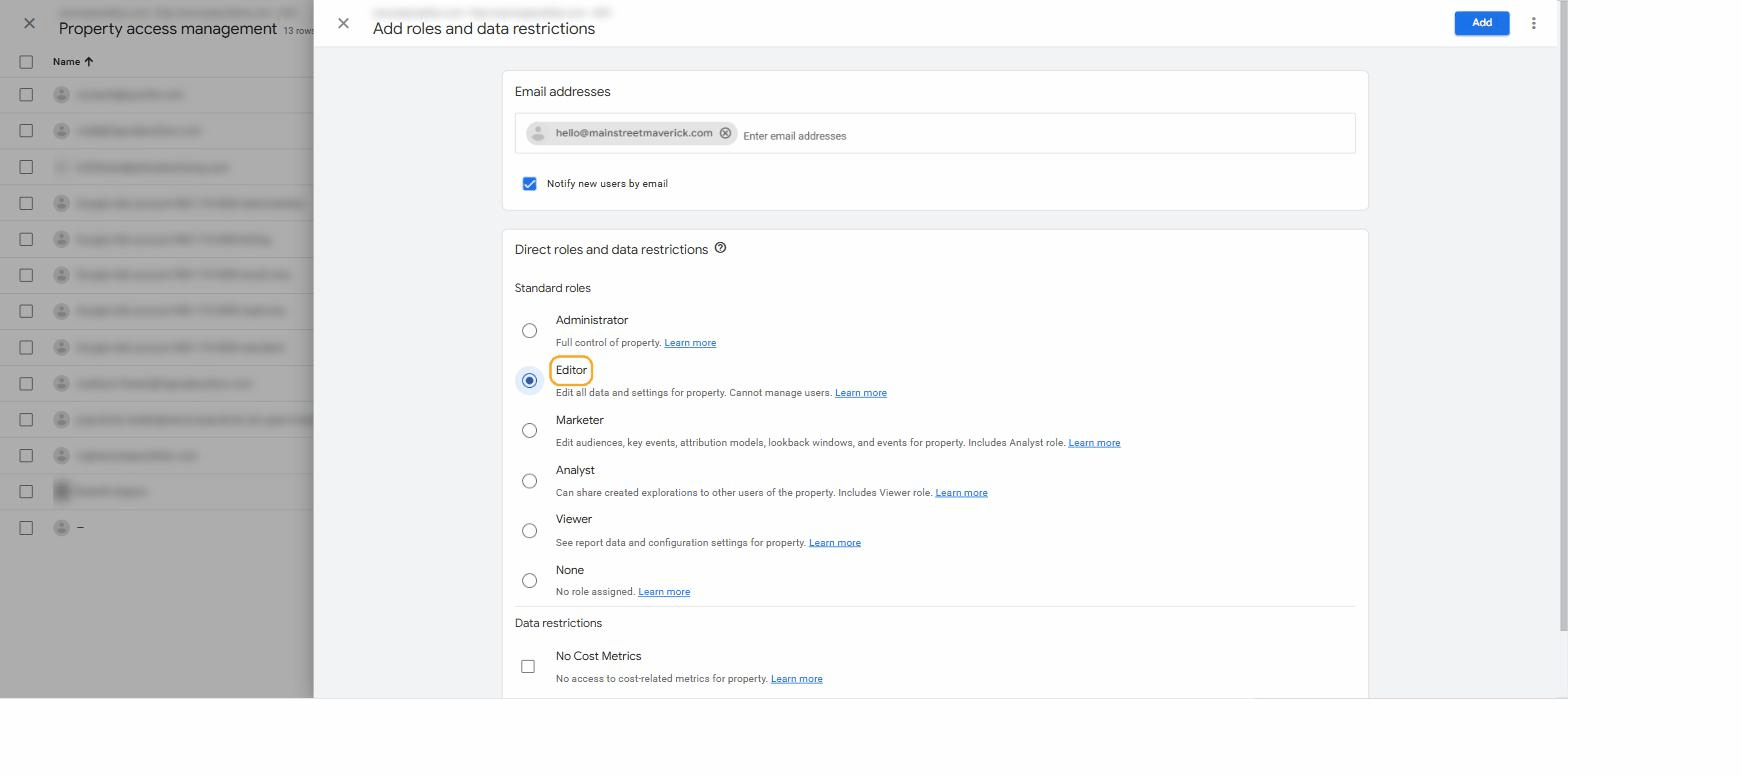
Step 3. Enter hello@mainstreetmaverick.com, choose the Editor role, and click Add.
Add roles dialog with the email entered and Editor role selected

7Google Search Console

About 1 minute. You need: the Google account that owns your Search Console property. If you do not have Search Console yet, skip this; we set it up and make you the owner.

Grants us the ability to see exactly how Google crawls and ranks your site, and to fix indexing problems.
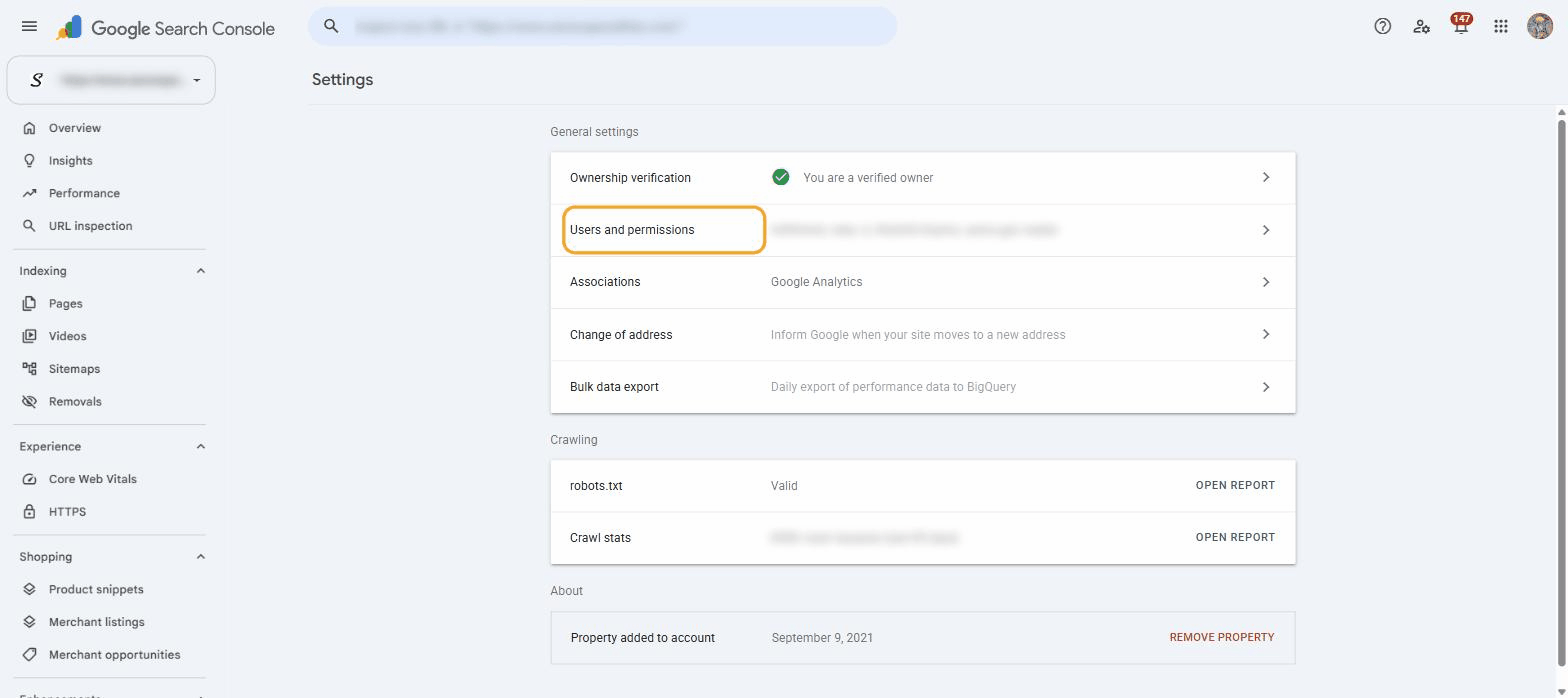
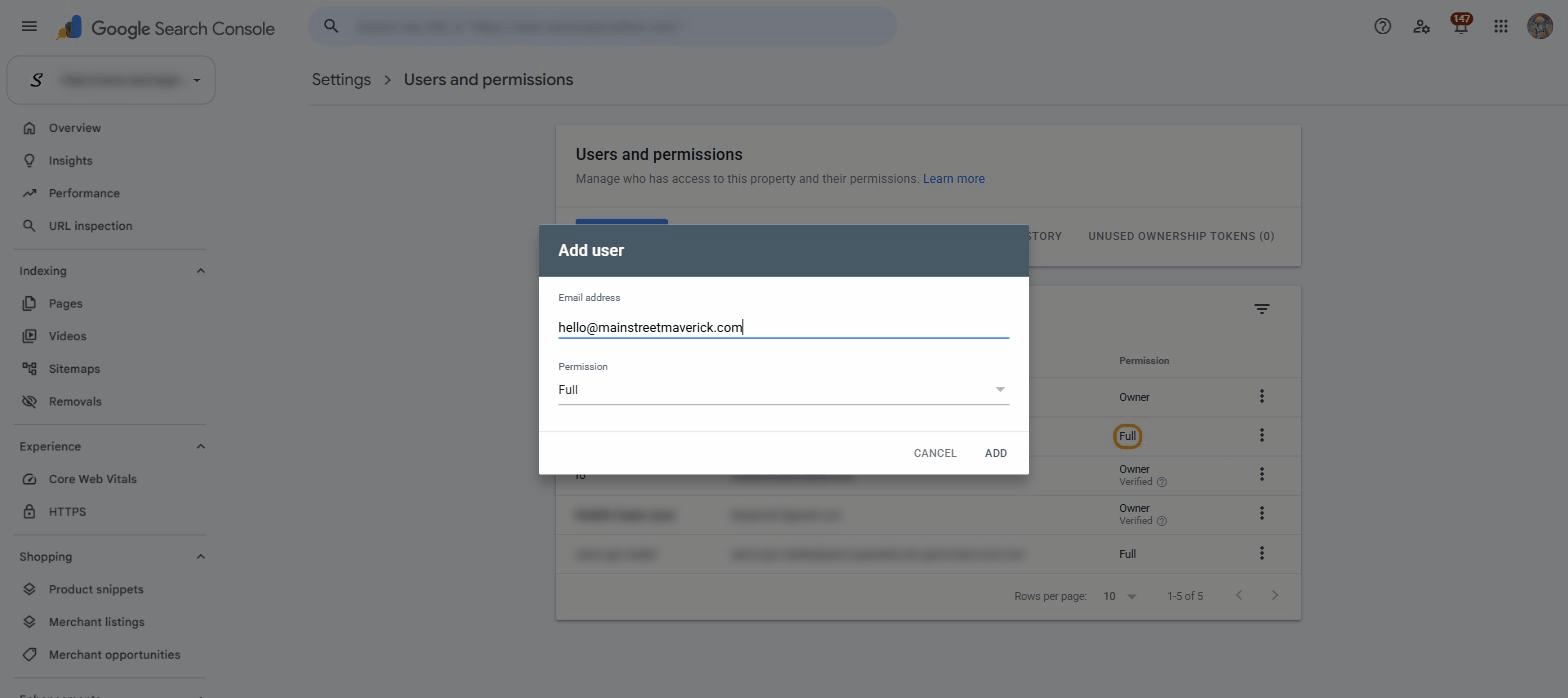
Step 1. At search.google.com/search-console, select your property, click Settings in the left menu, then Users and permissions.
Search Console Settings screen with Users and permissions highlighted
Step 2. Click Add user, enter hello@mainstreetmaverick.com, choose Full permission, and click Add.
Add user dialog with the email entered and Full permission selected

8Microsoft Clarity

About 1 minute. You need: the account (Microsoft, Google, or Facebook sign-in) that owns your Clarity project. If you do not have Clarity, skip this; we set it up and add you.

Clarity is a free Microsoft tool that records how real visitors use your site (heatmaps and session recordings). It shows us where people get stuck, which guides what we fix next.
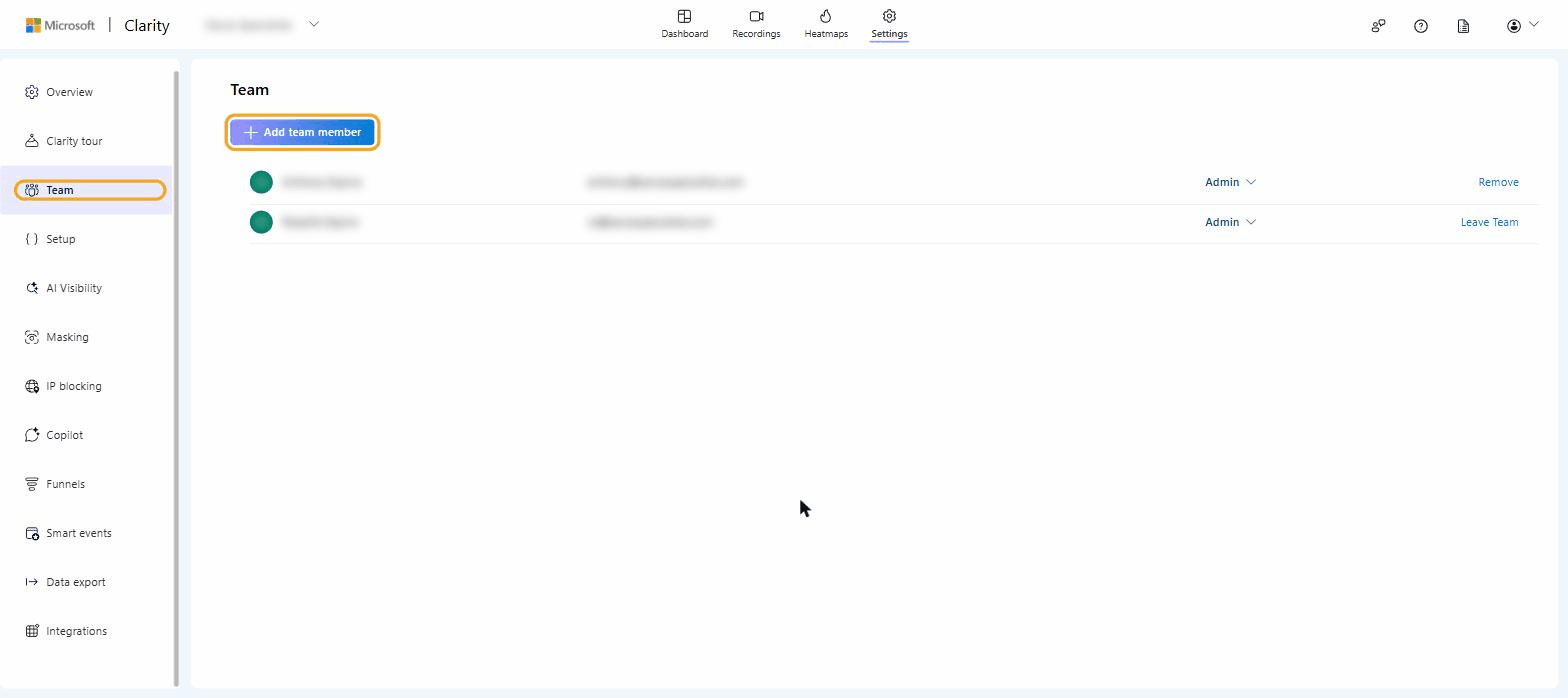
Step 1. At clarity.microsoft.com, open your project, click Settings, then Team in the left menu.
Microsoft Clarity project settings with the Team section highlighted
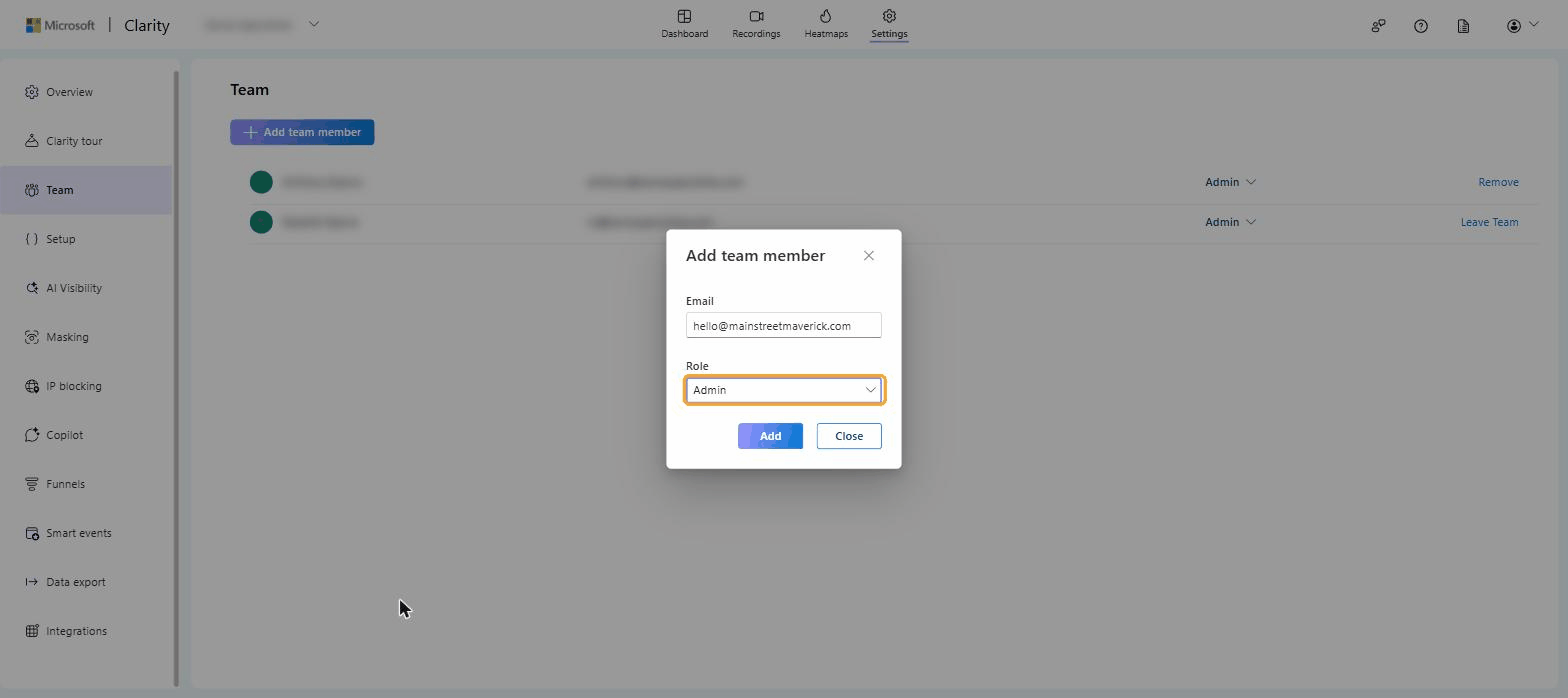
Step 2. Click Add team member, enter hello@mainstreetmaverick.com, choose the Admin role, and click Add.
Add team member dialog with the email entered and Admin role selected

9LinkedIn Page

About 2 minutes. You need: your LinkedIn login, and to already be an admin of your company Page. If you are not the Page admin, tell us who is and we will guide them.

Grants us the ability to place the LinkedIn Insight Tag and set up conversion tracking, so we can see which visitors come from LinkedIn and retarget the professional audience that matters for the firm.
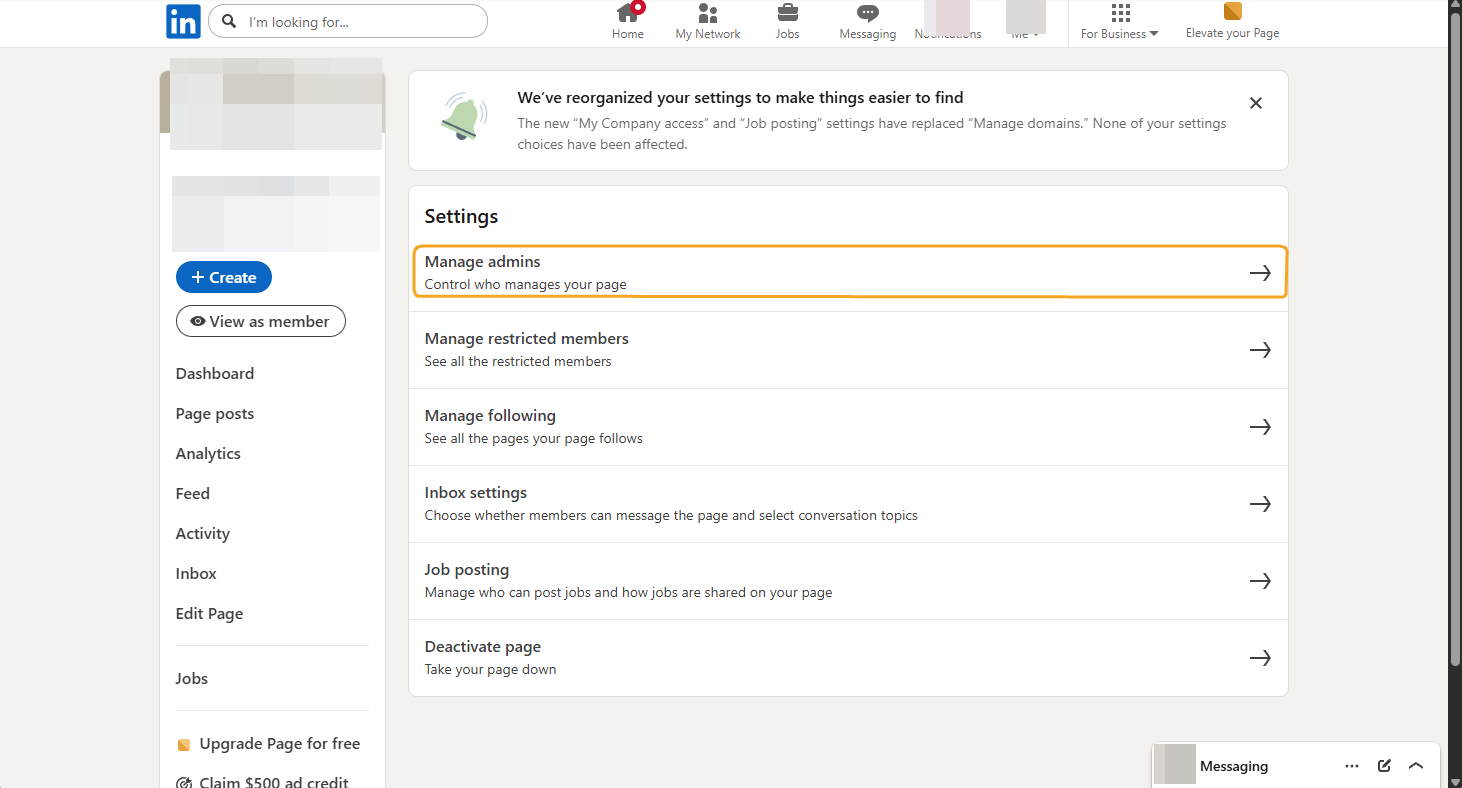
Step 1. Open your company Page as an admin, then in the left menu click Settings.
LinkedIn company Page admin settings screen with Manage admins highlighted
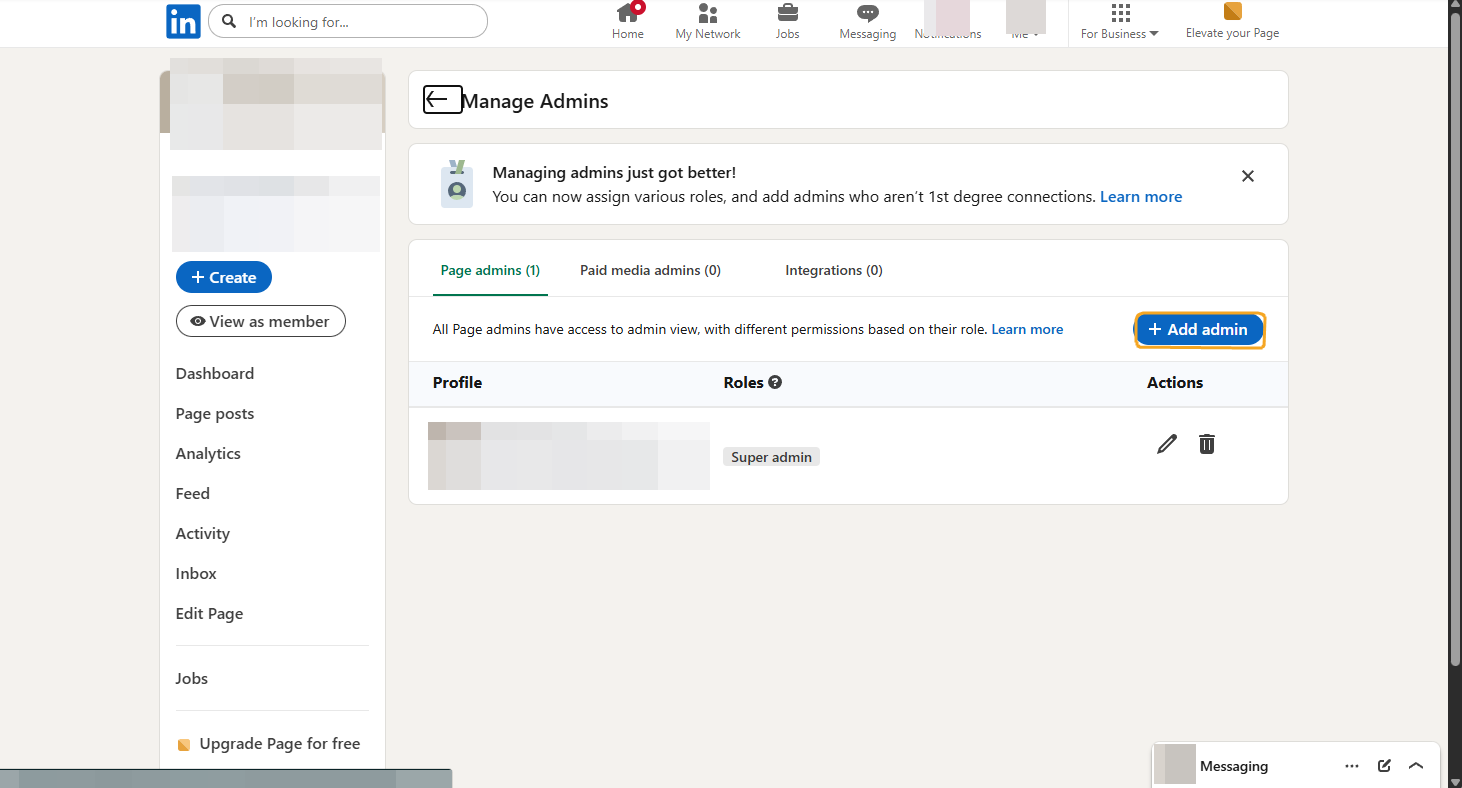
Step 2. Click Manage admins, then click the blue Add admin button on the right.
LinkedIn Manage Admins screen with the Add admin button highlighted
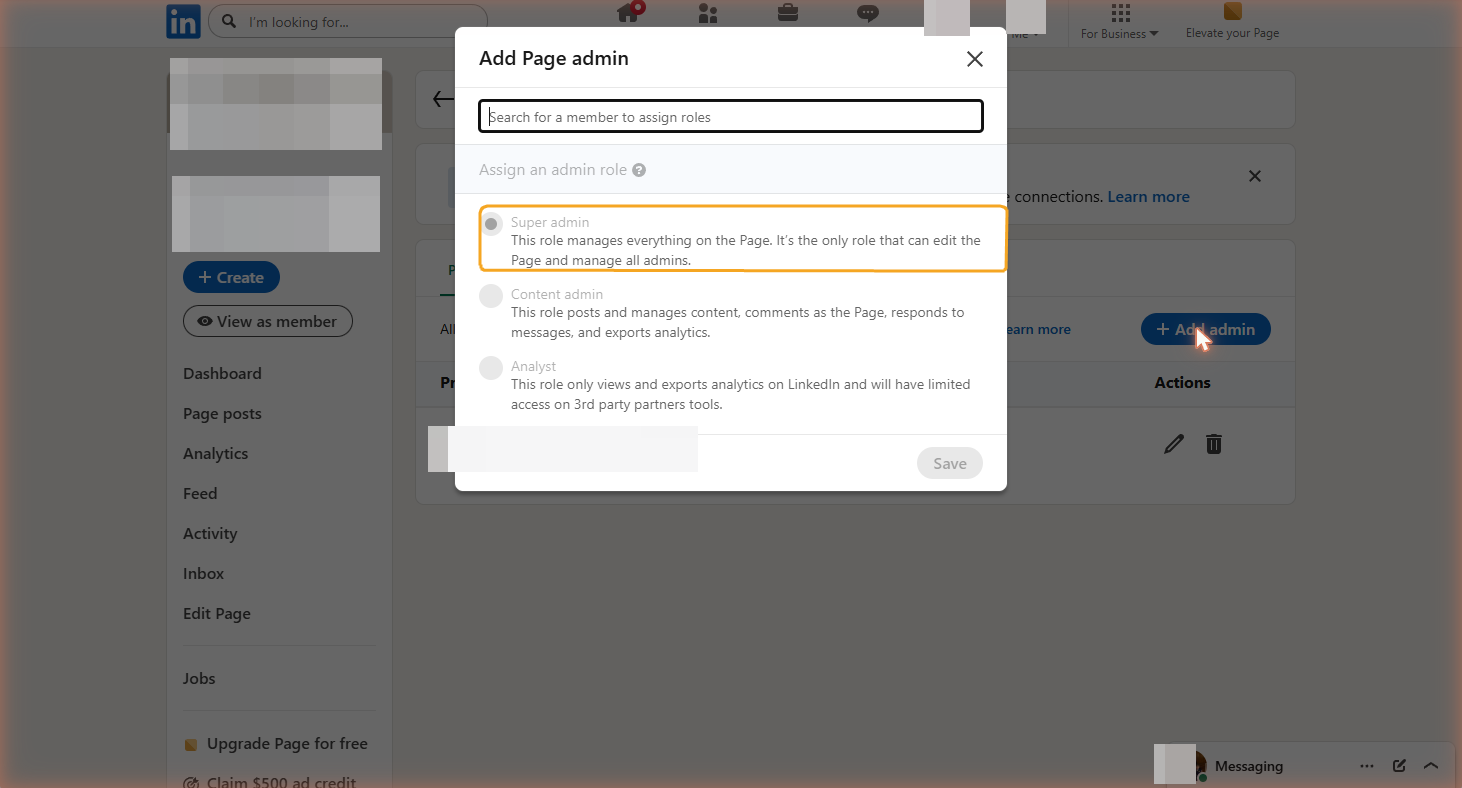
Step 3. Search for Main Street Maverick (or the name we give you), choose the Super admin role so we can place the tracking tag, and click Save. LinkedIn notifies us automatically; there is nothing to send.
Add Page admin dialog with the member search field and the Super admin role option
Stuck on any step? Screens change and accounts differ, and none of this is worth 20 minutes of frustration. Email us at hello@mainstreetmaverick.com and we will set up a quick screen share and do it together, or pick a time that works for you right now:
Book a screen-share session